Commercial LED Flood Lighting Buyers Guide: Selection, Optics, and Applications
Selecting and purchasing flood lights to illuminate outdoor areas can...
Learn More →Get expert guidance from our Product Specialists who match the right solutions to your project's requirements.

Commercial property owners understand that proper parking lot illumination goes beyond basic visibility-it’s essential for safety, security, and creating a welcoming environment. LED technology delivers superior performance compared to traditional lighting while offering substantial operational benefits. Converting to LED parking lot lights transforms both the functionality and economics of your outdoor lighting system.
Energy efficiency stands as the primary advantage of LED technology. When compared to HID parking lot lights like metal halide and high-pressure sodium fixtures, LED systems deliver 50-80% energy savings. Pairing these fixtures with intelligent controls such as photocells and motion sensors can push savings even higher, often reaching a 75% reduction in total energy consumption.
The U.S. Department of Energy’s solid-state lighting research confirms these substantial energy savings, documenting that LED outdoor lighting systems consistently outperform traditional HID technologies in both energy efficiency and light quality metrics across commercial applications.
Parking lot environments demand fixtures that withstand extreme weather conditions, temperature fluctuations, and constant exposure to elements. Metal halide and sodium vapor lights deteriorate rapidly under these conditions, requiring frequent maintenance and bulb replacements. LED shoebox lighting for parking lots eliminate these concerns with 50,000+ hour lifespans and robust construction designed for harsh outdoor conditions.
Beyond durability and efficiency, LED fixtures do not emit UV light, which means they are less likely to attract insects that typically swarm around traditional parking lot lights. Combined with minimal maintenance requirements and exceptional energy performance, LED technology provides the most comprehensive solution for parking lot lighting. Converting your existing system may seem complex, but understanding the key factors makes the transition straightforward and highly rewarding.
Important safety & compliance notice: This guide is for general planning and education. Final fixture selection, pole loading, aiming, electrical installation, and lighting levels must be verified by qualified professionals and must comply with applicable local codes and authority having jurisdiction requirements.
LED shoebox lights are pole-mounted outdoor area lights commonly used for parking lots, drive lanes, walkways, and perimeter security lighting. The name comes from the rectangular housing shape. Shoebox fixtures are designed to deliver controlled light distribution (typically Type III or Type V) for uniform coverage and reduced glare.
Choosing the right LED shoebox parking lot light comes down to matching the fixture to your site conditions (pole height, spacing, mounting), your performance goals (foot-candles and uniformity), and your compliance needs (controls, glare control, and pole loading). Use this checklist to avoid dark spots, wasted light, and costly rework. The sections below expand on each item with examples, specs, and tradeoffs.
Tip: If you want to eliminate guesswork, request a photometric lighting plan. It validates fixture count, distribution type, optics, and expected average/minimum foot-candles and uniformity before you buy.
Converting to LED parking lot fixtures delivers three primary benefits: superior light quality, dramatically lower operating costs, and reduced maintenance expenses. Many property owners also face the immediate need to replace failing fixtures, making LED conversion a logical upgrade rather than simply maintaining outdated technology. While LED fixtures require higher upfront investment, energy savings typically generate payback often within 2-3 years, followed by many additional years of reduced operating costs.
Quality LED parking lot fixtures cost more initially than traditional replacements. However, the combination of 50-80% lower energy consumption and minimal maintenance requirements quickly offsets this investment. Modern LED fixtures also feature single-person installation designs, reducing labor costs compared to heavy traditional fixtures that required two-person crews.
LED installation costs match or often undercut traditional fixture installation. Many current LED models feature lightweight construction and simplified mounting systems that streamline the installation process. Professional electricians can typically install LED fixtures faster than comparable HID systems.
Metal halide and fluorescent fixtures contain mercury, requiring special hazardous waste disposal procedures and associated fees. Converting to LED eliminates future disposal costs since LED fixtures contain no hazardous materials and can be recycled through standard electronic waste programs.
Most utility companies offer substantial rebates for LED parking lot conversions. These purchase rebates often cover 20-40% of fixture costs, significantly improving project economics. We help customers navigate rebate applications and ensure fixtures meet utility requirements for maximum incentive eligibility.

Before selecting new LED shoebox fixtures, evaluate your existing lighting performance. Adequate current light levels make LED conversion straightforward-simply match the lumen output with more efficient fixtures. Inadequate illumination requires a comprehensive parking lot lighting analysis to determine proper fixture placement and specifications.
Professional lighting designers can develop photometric plans that optimize fixture count, positioning, and specifications for uniform illumination. This analysis ensures compliance with IES (Illuminating Engineering Society) recommendations for parking lot lighting while minimizing fixture count and energy consumption.
The Illuminating Engineering Society establishes industry-standard lighting practices for parking facilities, with their RP-20 recommended practice for parking facility lighting providing comprehensive guidelines for illumination levels, uniformity ratios, and safety considerations that ensure optimal visibility and security performance.
Document these critical aspects of your current system:
Mounting compatibility determines which LED fixtures work with your existing infrastructure. Understanding current mounting hardware prevents costly mistakes and ensures proper fixture selection for seamless installation.
Slip fitter systems attach fixtures to horizontal arms extending from poles. The fixture housing slides over a 2-3/8 inch diameter tenon and secures with set screws. This mounting style works well for perimeter lighting where fixtures need to project light away from the pole.
Trunnion or yoke mounts provide the greatest installation flexibility, accommodating walls, poles, and horizontal arms. The adjustable bracket system allows precise aiming for flood lighting applications or specialized mounting requirements. We typically recommend trunnion mounts when fixtures need custom positioning or frequent adjustment.
Direct pole mounting through straight arm brackets offers the most secure attachment for high-wind environments. Square poles accept standard bolt patterns, while round poles require adapter plates. Pre-drilling ensures proper alignment and structural integrity.
Light distribution determines how effectively fixtures illuminate your parking area. Proper optic selection makes the difference between uniform, safe lighting and dark spots or excessive glare. Professional lighting plans use specialized software to model different distribution patterns and optimize coverage.
Most successful parking lot designs utilize Type III and Type V distributions, each serving specific applications within the overall lighting scheme. Pole height, spacing, and intended coverage areas determine which distribution pattern works best for each fixture location.
Type III optics create asymmetrical light patterns extending 2.75 times the mounting height forward and 1.75 times the mounting height to each side. This distribution works perfectly for fixtures mounted along parking lot perimeters, where light needs to project into the lot without waste light falling beyond the property line.
Type V optics produce circular, symmetrical light distribution extending equally in all directions. These patterns work ideally for fixtures mounted within parking areas, providing uniform illumination in a 360-degree pattern. Type V distribution maximizes coverage efficiency for interior pole locations.
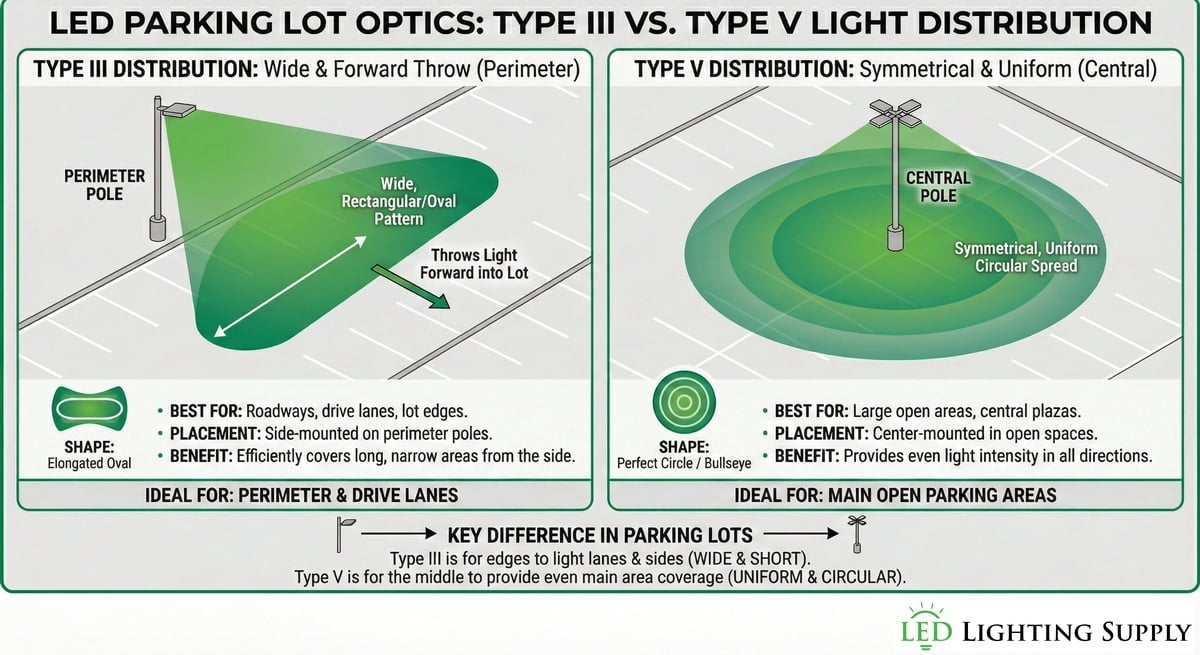
Modern LED parking lot fixtures incorporate full cutoff optics that direct virtually all light downward. Optional side shields and back light control accessories prevent light trespass onto adjacent properties while maintaining optimal illumination within the intended area. These features help meet increasingly strict municipal dark sky ordinances.
Retrofitting existing fixtures makes sense when housings remain in good condition and mounting infrastructure works for your needs. Retrofit kits replace internal components while utilizing existing fixture housing, reducing both material costs and installation time.
Complete fixture replacement delivers optimal performance and aesthetics while providing warranty coverage for the entire lighting system. New fixtures include the latest LED technology, refined optics, and integrated control options that may not be available in retrofit configurations.
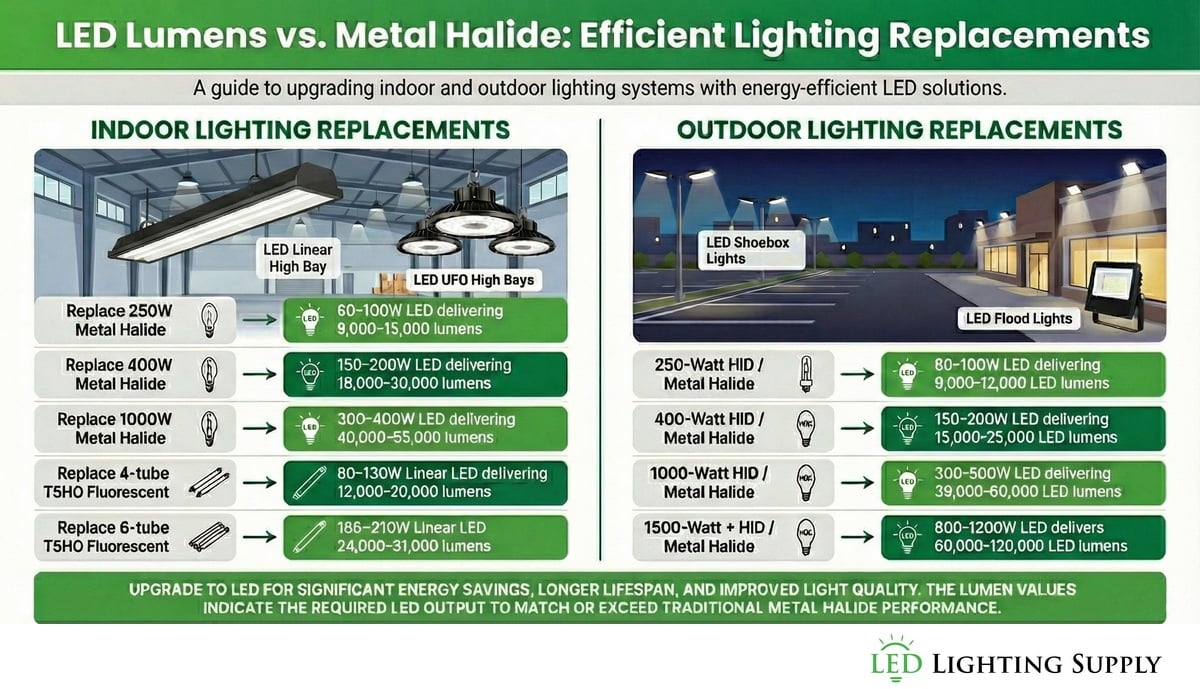
Focus on lumen output rather than wattage when selecting LED fixtures. Traditional wattage comparisons don’t translate directly to LED technology due to dramatic efficiency improvements. Modern LED fixtures produce equivalent light levels using 50-75% less power than comparable HID systems.
Evaluate LED efficiency by calculating lumens per watt from specification sheets. Quality parking lot fixtures should deliver 140-170 lumens per watt or higher. Fixtures producing less than 130 lumens per watt use outdated LED technology and won’t deliver optimal energy savings.
Always verify Design Lights Consortium (DLC) qualification for utility rebate eligibility. DLC Premium certification guarantees high efficiency and qualifies for maximum rebate amounts.
The Design Lights Consortium establishes rigorous efficiency standards for LED outdoor lighting, while Underwriters Laboratories (UL) safety standards ensure product reliability and electrical safety performance. Together, these certifications assure both energy efficiency and safe operation in demanding parking lot environments.
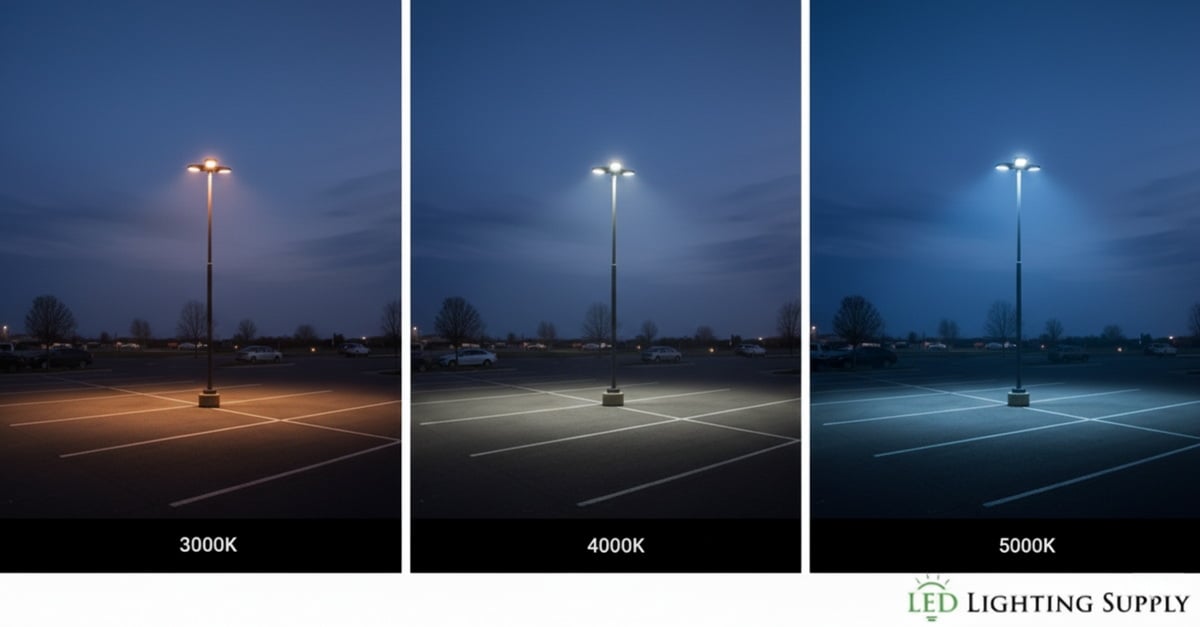
Color temperature affects both visual comfort and security effectiveness in parking environments. Most customers choose between 4000K and 5000K for an optimal balance of visibility and visual appeal.
We typically recommend 5000K for security-focused applications and 4000K for customer-facing areas like retail parking lots.
Color Rendering Index (CRI) measures light quality, while lumens measure light quantity. Higher CRI improves color accuracy and visual comfort, potentially allowing lower light levels while maintaining the same visual effectiveness.
High-pressure sodium fixtures typically provide CRI 22, making objects appear yellow or orange. Color Rendering Index values of 70-85 in LED fixtures deliver significantly improved color accuracy and visual appeal.
Utility companies offer LED rebates to reduce peak electrical demand and defer expensive power plant construction. These programs provide substantial savings that dramatically improve LED conversion economics. Rebate amounts vary significantly between utility companies and regions, with some programs covering up to 50% of fixture costs.
Switching from 400W metal halide to 100W LED delivers approximately 75% energy reduction, creating substantial ongoing savings beyond the initial rebate. Lighting standards established by the Design Light Consortium ensure fixture efficiency and performance.
DLC Premium certification qualifies fixtures for the highest rebate tiers. These fixtures exceed standard efficiency requirements and provide maximum utility incentives plus superior long-term energy savings.
LED compatibility with intelligent controls creates opportunities for energy savings beyond fixture efficiency improvements. Automated light controls optimize energy consumption by adjusting output based on actual lighting needs.
Photocells automatically activate fixtures at dusk and deactivate them at dawn, eliminating manual operation while ensuring consistent lighting schedules. These controls adjust seasonally as daylight hours change, providing year-round automatic operation without reprogramming.
Motion-activated controls maintain reduced light levels during unoccupied periods, then increase to full output when activity is detected. This approach maintains basic security lighting while delivering an additional 30-50% energy savings during low-activity periods. Dimming capabilities preserve LED lifespan while reducing energy consumption.

LED fixtures match or exceed metal halide lumen output while consuming 50-75% less energy. Beyond energy efficiency, LED technology provides superior light quality, instant operation, and excellent dimming compatibility.
Metal halide lamps require 3-5 minute warm-up periods to reach full brightness and cannot restart immediately after being turned off. LED fixtures provide instant full output and can be cycled on and off without performance degradation. This capability makes LED fixtures ideal for motion sensor applications that metal halide systems cannot accommodate.
The 6,000 to 15,000 hour lifespan of metal halide lamps requires frequent replacement compared to 50,000+ hour LED fixture life. Compared to HID systems, LED fixtures virtually eliminate routine maintenance over their operating life.
The robust construction and versatile mounting options of parking lot fixtures make them suitable for various outdoor applications beyond parking areas. Many customers successfully use these fixtures for tennis courts and basketball courts where high-quality, uniform illumination is essential.
Trunnion-mounted fixtures work exceptionally well as billboard light fixture solutions when inverted and aimed upward. The precise optical control and high lumen output make them ideal for advertising and signage illumination.
Most commercial parking lots operate fixtures approximately 12 hours nightly, totaling 4,380 hours annually. Over 10 years, this represents 43,800 hours of operation. Quality LED parking lot fixtures easily exceed 50,000 hour lifespans, providing reliable operation beyond typical payback periods.
Unlike HID lamps that fail suddenly, LED fixtures gradually reduce output over time while continuing to operate. This characteristic eliminates unexpected dark areas and reduces emergency maintenance calls.
Rather than estimating lighting requirements, professional photometric analysis takes the guesswork out of LED conversions. Lighting plans use specialized software to model your specific parking lot dimensions, pole locations, and fixture specifications to ensure optimal illumination levels and uniformity.
Professional lighting design ensures compliance with IES recommendations for parking lot safety while minimizing fixture count and energy consumption. These plans also support utility rebate applications and provide accurate project cost estimates based on actual fixture requirements rather than rough estimates.
Fixtures should carry essential certifications, including DLC Premium, UL Listed, and ETL Listed approvals. These certifications ensure safety, performance, and energy efficiency while qualifying your project for utility rebates and tax incentives. DLC Premium certification guarantees the highest efficiency standards and maximum rebate eligibility.
Our experienced product specialists provide complimentary custom lighting plans tailored to your specific parking lot layout and requirements. We analyze your existing fixtures, pole heights, and spacing to create precise photometric plans that ensure proper illumination levels while minimizing fixture count and maximizing energy savings. These detailed calculations help you secure utility rebates and provide accurate project costs before ordering. Our team performs energy savings calculations that show your exact annual savings based on your specific electricity rates and operating schedule, helping you make informed decisions about your LED conversion investment.

Dwayne Kula - Founder, President & Chief Technology Officer, LED Lighting Supply
Dwayne Kula is the Founder, President, and Chief Technology Officer of LED Lighting Supply, a company he established in 2008 to help businesses adopt reliable, high-performance LED lighting solutions. With more than 17 years of experience working with LED technology and lighting systems, Dwayne has developed extensive expertise in LED fixtures, energy-efficient lighting design, and commercial and industrial lighting applications.
In his role, Dwayne evaluates lighting technologies, guides product selection, and leads the development of technical and educational content for the LED Lighting Supply website. A significant part of his work involves creating articles and resources that help facility managers, contractors, and engineers better understand LED lighting and make informed purchasing decisions. His hands-on industry experience and technical knowledge help ensure customers receive practical, trustworthy guidance when selecting LED lighting solutions.