LED Parking Lot Retrofit Kits
- Converts compatible HID fixtures to LED without full replacement
- Select models may qualify for DLC listing and rebates
- Application support available for host-fixture compatibility


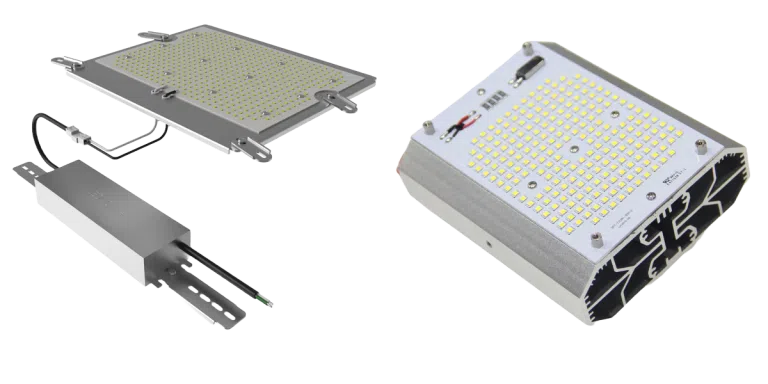

Our LED Shoebox Retrofit Kits for Parking Lots include LED modules with integrated heat sinks and compatible drivers for upgrading existing shoebox fixtures. Available kits support 120-277V input voltage and replace HID lamps and magnetic ballasts in existing fixture housings.
These parking lot LED retrofit kits are used for outdoor parking lots and facilities upgrading 250-watt, 400-watt, or 1000-watt metal halide lighting systems.
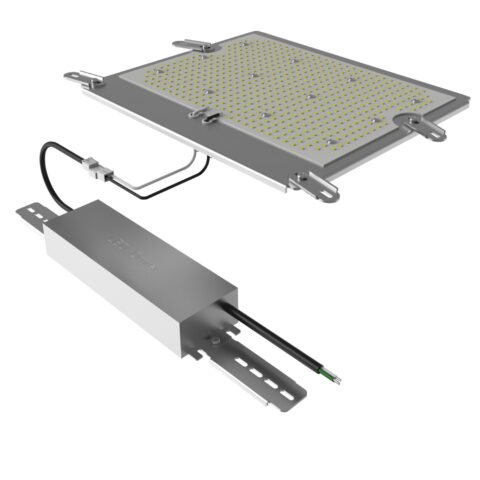


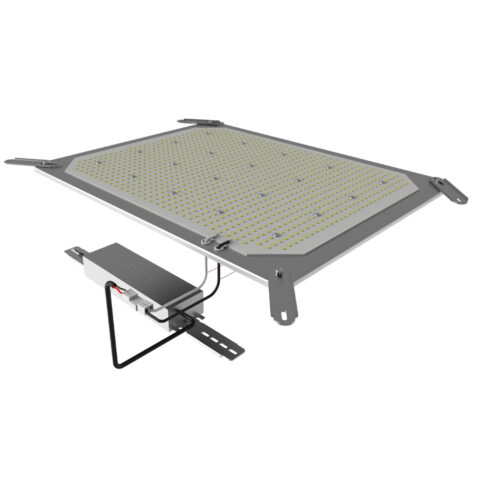
What are LED Shoebox Retrofit Kits / Parking Lot LED Retrofit Kits?
LED shoebox retrofit kits are designed to convert compatible existing parking lot or area-light fixtures from HID or other legacy light sources to LED without replacing the entire luminaire housing.
Depending on the retrofit kit, the conversion may include an LED light engine or module, driver or power supply, mounting plate or bracket, wiring components, labels, and other installation hardware. The exact components that are removed, retained, relocated, or replaced depend on the specific retrofit kit and the host fixture.
LED parking lot retrofit kits can be a cost-effective option when the existing shoebox light fixture housing, mounting system, lens, door, gaskets, wiring compartment, and other components remain suitable for continued service.
Before ordering, confirm the retrofit kit is suitable for the host luminaire and that the existing fixture has enough internal space, appropriate mounting provisions, compatible electrical characteristics, and acceptable physical condition. Also confirm voltage, controls compatibility, environmental exposure, DLC status where applicable, certifications, and whether the resulting photometric performance is appropriate for the parking lot layout.
Retrofit kits are commonly used to upgrade older metal halide fixtures, including installations that previously used 250-watt, 400-watt, 1000-watt, or other HID lamps. The appropriate LED replacement should be selected from lumen output, fixture optics, mounting height, spacing, photometric performance, and required light levels rather than legacy lamp wattage alone.
Step-by-Step Installation Process
Installation procedures vary by retrofit kit and host fixture. The certified retrofit kit manufacturer's installation instructions should determine which original luminaire components are removed, retained, relocated, or reused.
Do not assume that the reflector, lamp socket, ballast, wiring, lens, mounting plate, or other internal components should always be removed. Some retrofit kits may require removal of the original reflector, while others may use or work around existing reflector geometry. Removing components that the retrofit instructions require to remain in place can affect mechanical fit, optical performance, thermal management, wiring clearances, environmental sealing, or the conditions under which the retrofit kit was evaluated.
A typical HID-to-LED retrofit may involve some of the following steps, depending on the exact kit:
- Disconnect and verify power is off: Follow applicable electrical safety procedures before opening or modifying the luminaire.
- Inspect the existing fixture: Check the housing, lens, door, hinges, gaskets, wiring compartment, mounting hardware, corrosion, water intrusion, and other conditions that could affect continued use.
- Confirm host-fixture compatibility: Verify that the retrofit kit is suitable for the fixture type, dimensions, internal configuration, electrical system, and installation conditions specified in the retrofit kit instructions.
- Remove only the components identified by the retrofit instructions: This may include the HID lamp, ballast, capacitor, ignitor, lampholder, reflector, or other components depending on the kit design. Do not remove the reflector or other components unless the specific retrofit instructions call for it.
- Install the LED module or mounting assembly: Use the mounting points, brackets, hardware, clearances, and orientation specified by the kit manufacturer.
- Install the driver or power supply: Mount the driver in the location and orientation specified by the instructions, maintaining required spacing and thermal clearances.
- Complete the electrical connections: Connect branch-circuit wiring, grounding, driver leads, controls, surge protection, and LED-module wiring according to the kit instructions and applicable electrical requirements.
- Install required retrofit labels: Certified retrofit kits may include field-applied labels that identify the converted luminaire and provide required installation or lamp-replacement information.
- Inspect seals and enclosure components: Reinstall doors, lenses, gaskets, covers, and hardware as required by the host fixture and retrofit instructions.
- Test the completed installation: Confirm proper operation, controls, aiming, and any required commissioning before returning the fixture to service.
Using a listed or certified LED retrofit kit and installing it according to its markings and instructions helps maintain the evaluated safety characteristics of the converted luminaire. Retrofit kits should not be treated as generic collections of interchangeable components.
Should the Existing Reflector Be Removed?
Not necessarily. Reflector removal is determined by the design and installation instructions of the specific LED retrofit kit.
Depending on the kit, the original reflector may:
- Need to be removed to provide room for the LED light engine or mounting plate.
- Need to remain in place because it is part of the evaluated host-fixture configuration.
- Need to be repositioned or modified only as specifically instructed by the retrofit manufacturer.
- Have no meaningful optical function after conversion but still affect spacing, fit, shielding, or internal configuration.
Removing a reflector simply because the original HID lamp no longer needs it can create unintended problems if the retrofit kit was not designed for that configuration. Follow the retrofit kit instructions rather than applying a universal reflector-removal rule.
Host Fixture Condition Matters
An LED retrofit kit reuses part of the existing luminaire, so the condition of the host fixture matters. Installing a new LED module does not restore deteriorated housings, lenses, gaskets, wiring, hinges, latches, mounting hardware, or corrosion-damaged components.
Before retrofitting, inspect the host fixture for:
- Corrosion or material deterioration
- Water intrusion
- Damaged or brittle wiring
- Cracked lenses or doors
- Failed or compressed gaskets
- Loose hinges, latches, or hardware
- Damaged mounting components
- Insufficient internal space for the retrofit
- Evidence of excessive heat or previous electrical failure
If the existing luminaire is badly deteriorated, a complete new LED parking lot fixture may be more appropriate than a retrofit.
Maintaining Environmental Protection After Retrofit
The converted fixture should be reassembled in accordance with both the retrofit kit instructions and applicable host-fixture requirements. Doors, lenses, gaskets, conduit entries, covers, fasteners, and other enclosure components should be inspected and properly installed.
Do not assume that installing an LED retrofit automatically preserves the original fixture's environmental rating. The final suitability of the converted luminaire depends on the certified retrofit configuration, host fixture condition, installation method, sealing components, and applicable product markings.
Where the installation is exposed to rain, dust, moisture, washdown, salt air, or other environmental conditions, confirm that the completed retrofit is suitable for that environment.
Thermal Management and Internal Clearances
LED retrofit kits operate inside an existing luminaire housing, so thermal management and physical clearance are important. The LED module, heat sink, driver, wiring, reflector where retained, and other internal parts should be installed exactly as specified by the retrofit manufacturer.
Do not relocate drivers, remove internal components, cover heat sinks, alter ventilation, or change the mounting orientation unless the retrofit instructions specifically permit it. Those changes can affect operating temperature and component life and may move the installation outside the evaluated configuration.
Expected Lifespan and Performance
LED retrofit kits can provide long operating life and reduced routine maintenance compared with older HID systems, but lifetime varies by model, driver, LED module, operating temperature, electrical conditions, controls, host-fixture environment, and installation quality.
Selected retrofit kits may have published lumen-maintenance ratings of 50,000 hours or more. Confirm the exact product's lumen-maintenance data and driver-life information rather than assuming every retrofit kit has the same rated life.
Likewise, the converted fixture's light distribution may differ significantly from the original HID system. A retrofit with adequate total lumens does not automatically reproduce the original coverage, uniformity, or aiming. For larger parking lots or projects with specific light-level requirements, review the retrofit kit's photometric data or prepare a lighting plan before ordering.
Energy Savings with LED Parking Lot Retrofit Kits
LED retrofit kits can substantially reduce lighting energy use when replacing older HID systems, but the percentage savings varies by project.
Actual savings depend on:
- Existing lamp and ballast wattage
- LED retrofit wattage
- Fixture quantity
- Annual operating hours
- Lighting controls
- Required maintained light levels
- Any change in fixture quantity or operating schedule
For example, replacing a higher-wattage metal halide system with a substantially lower-wattage LED retrofit can produce significant energy savings, but a fixed 60-70% reduction should not be assumed for every installation.
Voltage and Electrical Compatibility
Retrofit kit input voltage varies by product. Many commercial retrofit drivers support ranges such as 120-277V, while other models may be available for higher-voltage systems such as 347V or 480V.
Confirm the actual supply voltage, driver input range, grounding, branch-circuit requirements, surge protection, controls, dimming, and wiring configuration before ordering. A universal-voltage driver should not be assumed for every retrofit kit.
Controls and Dimming
Some LED shoebox retrofit kits support dimming, photocells, occupancy controls, wireless controls, or other energy-management systems. Compatibility varies by driver and kit.
If controls are being retained or added, confirm:
- Driver dimming protocol
- Control voltage
- Photocell compatibility
- Occupancy or motion-sensor compatibility
- Wireless control requirements
- Surge-protection requirements
- Whether controls are included with the kit or supplied separately
Installation Time
Installation time varies considerably depending on the existing fixture, access method, pole height, internal condition, kit design, wiring, corrosion, controls, and installer experience.
Some straightforward retrofits can be completed relatively quickly, while others may require substantially more time for fixture access, component removal, cleaning, wiring changes, gasket replacement, repairs, aiming, or commissioning. A fixed installation time such as 30-45 minutes should be treated as a project-specific estimate rather than a universal expectation.
Certifications, Rebates, and Warranty Support
LED shoebox retrofit kits from LED Lighting Supply may carry safety certification or classification from organizations such as UL or ETL, depending on the exact product. Certified retrofit kits should be installed in the host luminaire types and configurations identified by the kit manufacturer and in accordance with the supplied installation instructions.
Selected retrofit kits may also appear on the DLC or DLC Premium Qualified Products List. DLC status and utility rebate eligibility are model-specific and program-specific, so confirm the exact product listing before assuming eligibility.
Most retrofit kits include a 5-year warranty unless otherwise specified. Warranty terms should be confirmed for the exact model being ordered.
Before purchase, verify:
- Host-luminaire compatibility
- Required internal dimensions and clearances
- Mounting method
- Which original fixture components must be removed or retained
- Input voltage
- Driver and controls compatibility
- Safety certification or classification
- DLC status where applicable
- Environmental suitability
- Required field-applied labels
- Photometric performance
- Warranty coverage
Important: A retrofit installation should follow the exact kit markings and installation instructions. LED Lighting Supply can help review product compatibility and photometric requirements, but field installation, electrical modifications, permitting, and code compliance should be handled by the appropriate qualified electrical professional and authority having jurisdiction.
LED Parking Lot Retrofit Kits FAQs
When Is A Parking Lot LED Retrofit Kit A Practical Choice?
A parking lot LED retrofit kit can be a cost-effective choice when the existing shoebox or area-light housing, mounting system, lens, door, gaskets, wiring compartment, and other components remain suitable for continued service. If the existing luminaire is badly deteriorated, a complete new LED parking lot fixture may be more appropriate.
What Should I Verify Before Ordering An LED Parking Lot Retrofit Kit?
Before ordering, verify host-luminaire compatibility, internal dimensions and clearances, mounting method, input voltage, driver and controls compatibility, environmental suitability, photometric performance, and warranty coverage. Also confirm which original fixture components must be removed or retained and whether required field-applied labels are included.
How Should I Select An LED Retrofit To Replace An Older HID Fixture?
Select the LED replacement based on lumen output, fixture optics, mounting height, spacing, photometric performance, and required light levels rather than legacy lamp wattage alone. Retrofit kits are commonly used with older metal halide fixtures, including installations that previously used 250-watt, 400-watt, 1000-watt, or other HID lamps.
Will An LED Retrofit Kit Provide The Same Parking Lot Light Distribution As The Existing HID System?
No, the converted fixture's light distribution may differ significantly from the original HID system. Adequate total lumens do not automatically reproduce the original coverage, uniformity, or aiming, so larger parking lots or projects with specific light-level requirements should use photometric data or a lighting plan before ordering.
Should The Existing Reflector Be Removed During A Retrofit?
Not necessarily; reflector removal is determined by the design and installation instructions for the specific LED retrofit kit. Depending on the kit, the reflector may need to be removed, remain in place, or be repositioned or modified only as specifically instructed by the retrofit manufacturer.
How Do I Confirm Voltage And Controls Compatibility?
Confirm the actual supply voltage, driver input range, grounding, branch-circuit requirements, surge protection, controls, dimming, and wiring configuration before ordering. Some kits support dimming, photocells, occupancy controls, wireless controls, or other energy-management systems, but compatibility varies by driver and kit.
Can I Assume An LED Parking Lot Retrofit Will Preserve The Existing Fixture's Environmental Rating?
No, installing an LED retrofit does not automatically preserve the original fixture's environmental rating. Final suitability depends on the certified retrofit configuration, host fixture condition, installation method, sealing components, and applicable product markings.
Are DLC Listings, Rebates, And Warranties The Same For Every Retrofit Kit?
No, DLC status and utility rebate eligibility are model-specific and program-specific, so confirm the exact product listing before assuming eligibility. Most retrofit kits include a 5-year warranty unless otherwise specified, and warranty terms should be confirmed for the exact model ordered.