LED Lighting Tips: Color Temperature, Retrofits, Wattage, Rebates & More
We compiled a comprehensive collection of LED lighting insights based on 15+ years of commercial and industrial lighting experience. These tips cover everything from retrofitting existing fixtures to selecting the right wattage, optics, and color temperature for a specific application.
About this guide
Written by LED Lighting Supply’s commercial/industrial lighting team based on field support for warehouse, outdoor, and retrofit projects since 2008. For project-specific design, confirm requirements with the site electrician, authority having jurisdiction (AHJ), project engineer where applicable, and the applicable utility rebate program.
How to Choose the Right Color Temperature
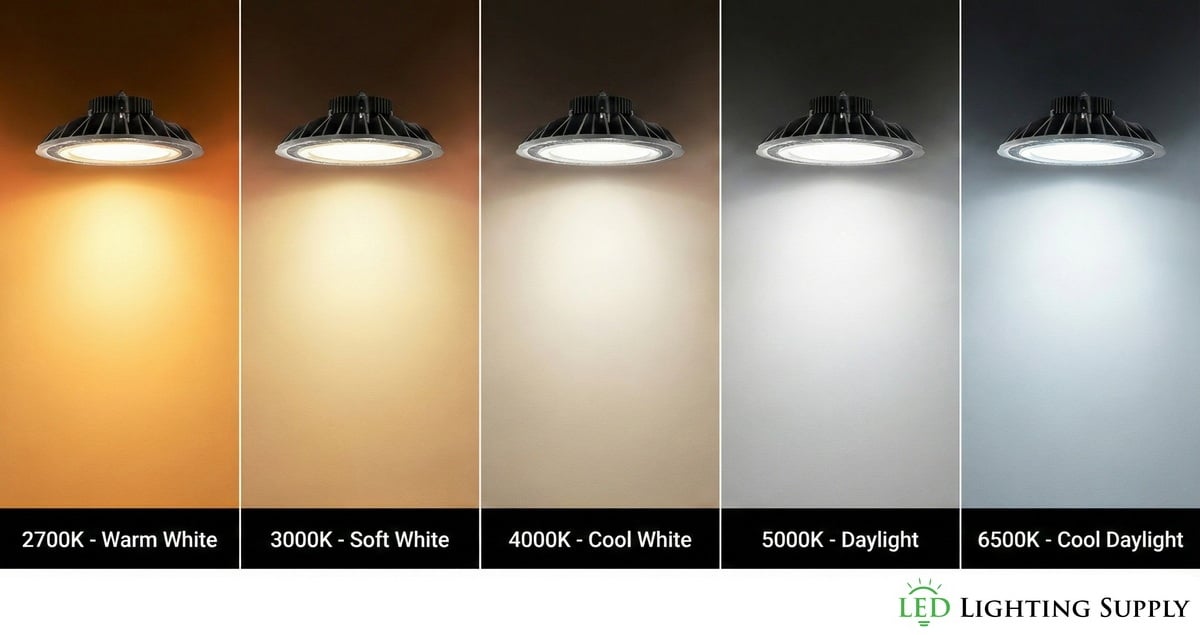
Color temperature, measured in kelvin (K), describes the apparent warm or cool appearance of white light. It does not determine brightness, color-rendering performance, energy efficiency, productivity, or eye strain on its own. Most commercial applications use color temperatures between 2700K and 6500K. Lower temperatures around 2700K produce warmer, more yellow-toned light, while higher temperatures near 6500K create a cooler, bluer-white appearance.
For metal halide and HID replacements, 5000K is a common choice for warehouses and manufacturing facilities. When replacing high-pressure sodium fixtures, 4000K may provide a more neutral-white appearance while remaining familiar to occupants accustomed to warmer lighting. Choose 2700K or 3000K where a warmer appearance is preferred. Offices, schools, and hospitals commonly use 3500K to 4000K, but the appropriate selection depends on visual tasks, finishes, occupant preferences, and project requirements.
Residential and hospitality applications often use 2700K or 3000K for a warmer appearance. LED color consistency depends on the LED package, driver, thermal design, production binning, and manufacturer quality controls. Review the fixture’s published color tolerance and warranty rather than assuming all LED products will maintain the same color appearance over their full service life.
Understanding Color Binning Requirements
Applications requiring precise color matching need careful attention to binning specifications and color tolerance. We can help review available fixture specifications and identify models with appropriate published tolerances for a consistent appearance across an installation. This can be particularly important in retail environments, architectural applications, and areas where fixtures will be viewed side by side.
Reasons You Should Retrofit Your Existing Fixtures to LED
Retrofitting existing fixtures can provide value when the existing housings, mounting, wiring, environmental protection, and condition are suitable for the selected retrofit system. A complete fixture replacement may be the better option when the existing fixture is damaged, obsolete, unsuitable for the environment, or cannot be modified while maintaining required listing and performance.
Preserve Your Infrastructure Investment
Installation time varies by fixture type and access conditions, but retrofits can be faster than full fixture replacement once the mounting approach is confirmed on-site. Compatibility depends on the existing housing dimensions, internal space, mounting points, wiring, thermal conditions, and environmental sealing, so verify fit and installation instructions before ordering at scale.
Navigate Permitting Requirements
Permit and inspection requirements are determined by the local authority having jurisdiction. Some retrofit projects may require permits or inspections, particularly where wiring is altered, circuits are modified, listed equipment is changed, or local energy-code requirements apply. Historic-district and exterior-lighting requirements may also apply. Confirm the scope with the AHJ and a qualified electrical professional before work begins.
Simplified Installation Process
A retrofit can reduce labor compared with replacing an entire fixture when the existing housing and mounting system remain suitable. Actual labor requirements depend on fixture weight, mounting height, access equipment, branch-circuit conditions, and manufacturer installation instructions. Installation should be performed by qualified personnel in accordance with applicable electrical requirements.

Another successful customer installation using LED aircraft hangar lights
Evaluate Retrofit Solutions That Use Socket Adapters Carefully
Socket-adapter retrofit kits can be convenient for some compatible applications, but they are not appropriate for every existing fixture. Verify the retrofit kit’s installation instructions, fixture compatibility, lamp-holder condition, orientation limits, weight limits, enclosure requirements, thermal conditions, and applicable electrical listing before use. A heavier retrofit assembly can place additional load on an existing socket or lamp holder, especially in outdoor or vibration-prone installations.
Bracket-mounted retrofit systems may provide a more appropriate mechanical mounting method for certain fixtures by transferring load to the housing rather than relying only on the lamp holder. The correct approach is model-specific. Rebate eligibility is also program-specific: utilities may require a product to appear on the current DesignLights Consortium Qualified Products List or meet other program criteria. Verify the exact product, configuration, and utility requirements before purchase.
Understanding Power Factor
Power factor (PF) describes the relationship between real power (watts) and apparent power (volt-amperes, VA). In plain terms, lower PF generally means higher current for the same wattage, which can reduce available circuit capacity and affect electrical-system sizing.
Important: A low power factor does not automatically mean a fixture uses more watts. Most facilities are billed primarily on kWh (real power), although power factor can matter for panel loading, generator sizing, and some commercial or industrial utility rate structures that include demand charges or power-factor adjustments.
- Higher PF can support more fixtures per circuit when conductor and overcurrent-device limits are the constraint.
- Lower PF increases current draw for the same real wattage and can reduce available circuit capacity.
- Target: PF of 0.90 or greater is common for many commercial and industrial LED drivers, but requirements vary by product and project.
When comparing products, review the driver specifications and confirm PF at the operating voltage and wattage being used.
Do Not Select LED Fixtures on Wattage Alone
Purchasing LED fixtures based solely on wattage can lead to inadequate lighting, excess energy use, glare, or uneven distribution. Proper LED selection should begin with the required light levels and the fixture’s photometric performance.
Step 1: Determine Required Light Levels
Measure existing light levels with a calibrated light meter when practical. Smartphone applications may be useful for rough comparison but are not a substitute for a calibrated meter. Identify task areas, safety concerns, and locations that are too bright or too dim so the new design can address them.
Step 2: Professional Photometric Analysis
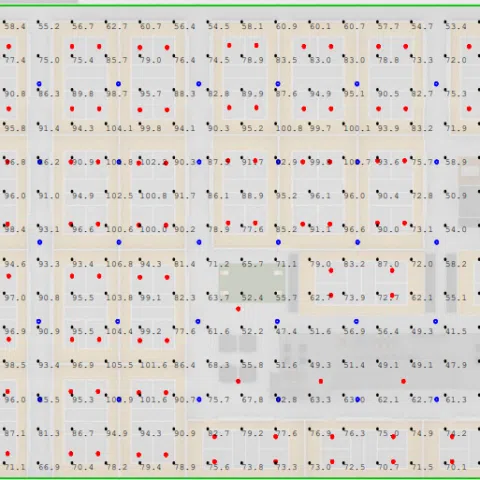
Photometric studies use fixture-specific IES files and lighting software to model a space before installation. We can use facility dimensions, mounting heights, mounting locations, and target illuminance criteria to compare fixture outputs and optics. A study can show calculated foot-candle or lux values and uniformity metrics, but field results can vary with installation conditions, reflectances, obstructions, and maintenance factors.
Step 3: Match Lumens and Optics to Requirements
Lumens describe total luminous flux, not the light delivered to a work surface. Fixture optics, mounting height, spacing, room surfaces, and orientation determine delivered foot-candles or lux. Select a fixture with published photometric data and output appropriate for the application.
Step 4: Determine Actual Wattage
Once the appropriate fixture and optical distribution are identified, compare the fixture’s published input wattage, operating voltage, controls, and expected operating schedule. This approach helps avoid over-lighting and under-lighting while identifying realistic energy savings.
Understanding Ballast Compatibility
Some LED replacement products are designed for direct-wire installation, while others are designed to operate with specific existing ballasts. The proper choice depends on the product instructions, existing equipment, installation cost, maintenance plans, and applicable listing requirements.
Direct-Wire LED Products
Direct-wire LED retrofit products or fixtures connect to the branch circuit as specified by the manufacturer. In many cases, the existing ballast is removed or bypassed and the LED driver supplies the LED module. This can eliminate dependence on an aging ballast, but installation must follow the product’s wiring instructions and applicable electrical requirements. Confirm whether the retrofit changes the fixture’s original listing and whether the selected kit is listed for the intended installation.
Ballast-Compatible LED Products
Ballast-compatible products can reduce installation time where the existing ballast is on the manufacturer’s compatibility list and is in suitable condition. Compatibility is not universal, and ballast failure can still result in future maintenance. Review the LED product’s current ballast compatibility list and consider the age and condition of the ballast before selecting this approach.
Understanding the Lifespan of LED
LED fixture service life involves multiple components, including LED packages, drivers, controls, surge-protection devices, optical materials, and mechanical parts. Each can have a different expected service life depending on ambient temperature, operating hours, electrical conditions, maintenance, and product design.
LED Chip Lifespan
LED lumen maintenance is commonly expressed as an L70 value: the projected operating time until light output reaches 70% of initial lumens under stated test conditions. Published L70 values vary widely by product and should be supported by manufacturer documentation using applicable LM-80 and TM-21 methodologies where relevant. Thermal design, drive current, ambient temperature, and operating conditions materially affect LED life.
Driver Lifespan
LED drivers convert incoming power to the controlled output required by LEDs. Driver life varies by design, temperature, surge exposure, operating hours, and load. Some fixtures allow driver replacement; others do not. Review the exact fixture warranty, driver specifications, serviceability, ambient-temperature rating, and replacement options rather than assuming a fixed driver life or fixture service life.

Another LED Lighting Supply successful conversion using LED warehouse lights
Understanding LED Dimming
LED dimming capability depends on the driver, fixture configuration, dimming method, controls, and compatibility between components. Dimming can reduce energy use when light output is reduced, and it can support occupancy and daylight-responsive controls when properly designed.
LED Triac Dimming
Triac or phase-cut dimming is common in residential and some light-commercial applications. The dimmer modifies the AC waveform supplied to a compatible LED driver. Confirm the fixture and dimmer compatibility list before installation because incompatible combinations can cause flicker, limited dimming range, noise, or premature failure.
0-10V Dimming
Commercial and industrial fixtures commonly use 0-10V dimming controls. These systems typically use separate low-voltage control conductors, often violet and gray in North American applications. The exact dimming curve, minimum output, and whether the fixture turns off at the low end vary by driver and control system. Occupancy sensors, schedules, and daylight controls can reduce output when properly commissioned for the application.
Understanding Voltages
Commercial and industrial facilities use a range of electrical systems. Confirm the supply voltage, phase, frequency, neutral availability, grounding, and fixture input rating before selecting equipment.
Common North American Voltages
Common nominal voltages include:
- 120V for many retail, office, and light-commercial applications
- 208V in many commercial three-phase systems
- 240V in some residential, agricultural, and light-industrial systems
- 277V commonly supplied from 480Y/277V commercial and industrial systems
- 347V commonly supplied from 600Y/347V systems in Canada
- 480V or 600V systems for certain industrial applications, subject to the fixture’s listed input rating
LED Driver Configurations
Many commercial fixtures use drivers rated for 120-277V, while selected models are available with 277-480V, 347V, or other input ranges. Do not assume a fixture automatically detects every voltage or is suitable for every electrical system. Verify the exact driver input range, frequency, certification/listing, and product cut sheet. Canadian projects may require equipment approved for the installation by an acceptable certification body and suitable for the applicable voltage.
Step-Down Transformers
Where a fixture is not available with a compatible input driver, a properly specified transformer may be used. Transformer selection and installation should be determined by a qualified electrical professional based on voltage, load, overcurrent protection, enclosure, location, and applicable code requirements.
Choosing the Right Optics
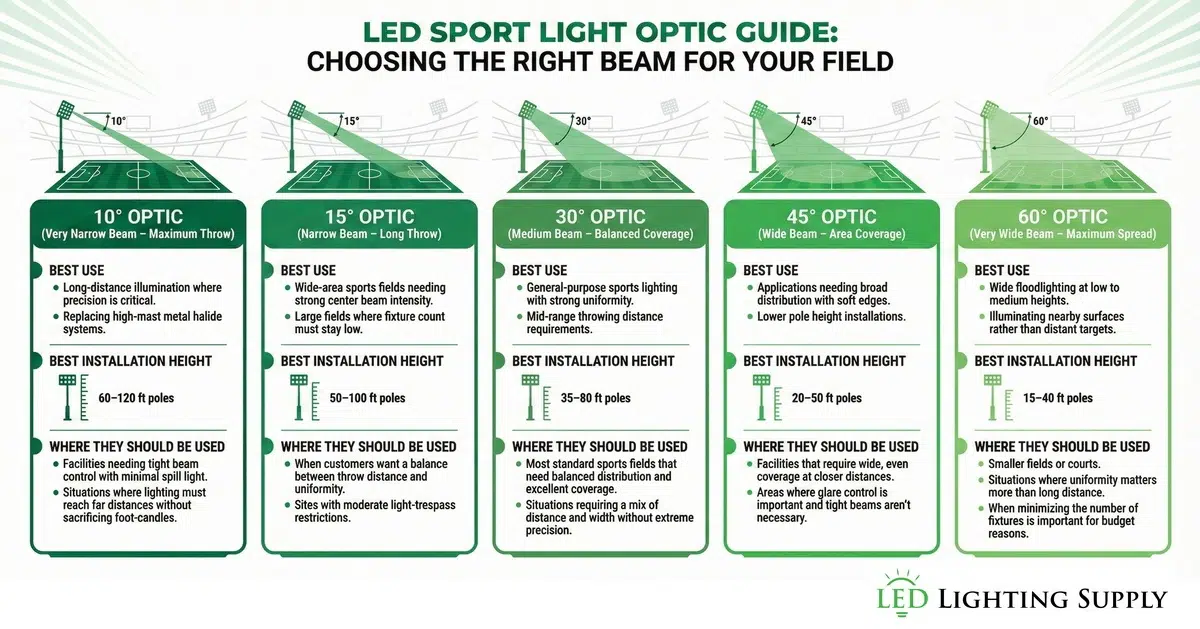
Optics determine where a fixture’s light is distributed. Incorrect optical selection can contribute to dark areas, excessive brightness, glare, and poor uniformity. The right distribution depends on mounting height, fixture spacing, target illuminance, task orientation, surface reflectances, and viewing positions.
- Narrower distributions can be useful for higher mounting heights or focused task areas.
- Wider distributions can be useful for lower mounting heights or broader coverage.
- Different zones within the same facility may require different outputs or distributions.
A fixture-specific photometric layout using current IES files is the appropriate method for evaluating average illuminance, minimum values, uniformity, and likely glare conditions. There is no universal beam angle, spacing rule, or fixture count that works for every facility.
What is CRI?
Color Rendering Index (CRI) is a measure of how faithfully a light source renders certain colors compared with a reference illuminant of similar color temperature. CRI is separate from lumen output, efficacy, and color temperature. It is useful for comparing color-rendering characteristics, but it does not by itself describe every aspect of visual quality.
CRI ratings range from 0 to 100, with higher values generally indicating better color-rendering performance under the test method. Higher-CRI products may have different efficacy and cost characteristics than standard-CRI products. Select CRI based on the visual task, color-critical work, and project requirements.
Retail Applications
Clothing stores, vehicle dealerships, and product showrooms may benefit from 80 CRI or higher, and some color-critical displays may call for 90 CRI or higher. Evaluate merchandise, finishes, customer expectations, and fixture photometrics when selecting a product.
Industrial and Warehouse Facilities
Many industrial and warehouse applications use fixtures in the 70 to 80 CRI range. Higher CRI may be appropriate for inspection, quality-control, paint, printing, or color-matching tasks. Required illuminance and uniformity remain important regardless of CRI.
Educational Facilities
Schools commonly use fixtures rated 80 CRI or higher, although project requirements and local standards vary. Art rooms, laboratories, video-production areas, and color-critical tasks may benefit from higher color-rendering performance.

Converting sports fields using LED baseball field lights and LED softball field lighting
What You Need to Know About Rebates
Utility rebates can reduce LED project costs, but eligibility requirements, incentive amounts, application processes, funding, and deadlines vary by utility and program.
Utility Company Administration
Your electric utility or program administrator sets rebate requirements. Review the current program documentation before purchase or installation, because some programs require preapproval, specific installation dates, contractor documentation, or a minimum project size.
DLC Qualification Requirements
Many utility programs require eligible products to be listed on the current DesignLights Consortium Qualified Products List. Other programs use different requirements. DLC qualification is an energy-efficiency and performance qualification, not an electrical safety certification. Verify the exact manufacturer, model number, configuration, and current listing status with the utility program.
DLC Standard vs. Premium Programs
DLC Standard and DLC Premium are separate qualification tiers for applicable product categories. Premium products must meet additional criteria in applicable categories, but qualification does not guarantee rebate eligibility or a particular incentive amount. The utility’s current program rules control.
Premium Rebate Advantages
Some utilities offer higher incentives for DLC Premium products or limit incentives to specified tiers. Other programs accept Standard-qualified products or use their own criteria. Many fixtures may be available in configurations that qualify for rebates, including selected area lights, high bays, and wall packs. Contact us to review product documentation and current program requirements.
Understanding Outdoor Light Patterns
Parking-lot lighting requires an appropriate distribution pattern, mounting arrangement, output, and photometric layout to achieve the project’s target illuminance and uniformity. IES distribution types are useful descriptions, but they do not replace a site-specific lighting design.
Type 1 Through Type 5 Distribution Patterns
IES roadway and area-light distributions are generally described as follows:
- Type I: A narrow, symmetrical distribution commonly used for walkways, paths, and narrow roadways.
- Type II: A lateral distribution suited to narrower roadways, walkways, and perimeter applications.
- Type III: An asymmetrical forward-throw distribution commonly used for parking areas and roadway-side mounting.
- Type IV: A forward-throw distribution designed for perimeter mounting, such as along building sides or property lines.
- Type V: A symmetrical distribution, often square or circular depending on the fixture, commonly used for area lighting.
Many LED shoebox lights are available with Type III, Type IV, Type V, or other distributions depending on the model and optic.
Photometric Studies Confirm Performance
Lighting software can use a parking-lot layout, mounting heights, pole locations, fixture orientations, and IES files to calculate predicted foot-candle or lux values. This helps compare outputs and optics before installation. Final design criteria may also be affected by local ordinances, property conditions, spill-light limits, glare considerations, and security requirements.

Calculating Cost Savings for Outdoor Lighting
LED conversion savings depend on the existing system’s actual input power, replacement LED input power, operating hours, controls, electricity rate, demand charges where applicable, and maintenance costs.
Current Lighting Assessment
Identify the existing fixture’s actual input wattage whenever possible. HID system input wattage includes lamp and ballast losses, but those losses vary by lamp type, ballast type, operating condition, and age. Use manufacturer data, measured demand, or a reasonable documented estimate rather than applying a fixed percentage to every HID system.
LED Replacement Sizing
Proper LED sizing starts with required illuminance, uniformity, glare, and distribution rather than wattage matching. A fixture-specific photometric analysis can help determine an appropriate replacement and its published input wattage.
Savings Calculation
Compare the existing system’s total input power with the LED fixture’s input wattage, then multiply the difference by operating hours and the applicable electricity rate. For example, if a measured or documented HID system draws 460W and the replacement LED fixture draws 150W, the connected-load reduction is 310W per fixture. Actual bill savings can differ based on rates, controls, demand charges, and operating schedules.
Fans are Good (Active Cooling)
LED fixtures may use active cooling with fans or passive cooling with heat sinks and fixture housings. Both approaches can be effective when the fixture is properly engineered for its operating environment.
Active Cooling Benefits
Active cooling can move air across heat-dissipation components and may allow a more compact fixture design. Fans are additional moving components, however, and their suitability depends on ambient temperature, dust, moisture, maintenance access, and the manufacturer’s environmental design. Review the fixture’s published ambient-temperature rating, ingress-protection rating, warranty, and maintenance guidance.
Passive Cooling Design
Passive systems use heat sinks, housings, and airflow around the fixture to dissipate heat without fans. They can be useful where minimizing moving parts is a priority, but passive cooling performance also depends on the fixture’s installation orientation, ambient conditions, and available airflow.
Application Considerations
Neither cooling method is universally better. Select a fixture based on its published thermal design, ambient rating, environmental protection, maintenance requirements, and suitability for the specific application. Dusty, corrosive, wet, or high-temperature environments may require additional review of materials, seals, coatings, and manufacturer documentation.
Understanding L70
L70 is a lumen-maintenance metric indicating the projected time until LED light output reaches 70% of its initial value under stated conditions. It is useful for comparing products when the underlying test methods, temperatures, drive conditions, and reporting assumptions are comparable.
Lumen Maintenance Testing
LED package lumen maintenance is commonly measured using IES LM-80 testing and projected using IES TM-21 methodology. Fixture-level performance may also be affected by drivers, optics, thermal design, dirt depreciation, and operating conditions. Review the manufacturer’s reported data and applicable warranty rather than relying on a single life claim.
L90 vs L70 Ratings
L90 indicates the projected time to 90% of initial light output, while L70 indicates the projected time to 70%. Reported values may be based on LM-80/TM-21 data, manufacturer calculations, or other stated methods. Confirm the basis of a reported life value when comparing fixtures.
What are the Cost Savings and ROI When You Convert from Metal Halide to LED?
Compare estimated energy costs, 5-year savings, simple payback, and ROI for replacing metal halide fixtures with LED.
150W LED Parking Lot Lights vs 400W Metal Halide Replacement (with ballast)
Assumptions: Based on 12 hours/day, 365 days/year at $0.20/kWh,
20 fixture(s), and a 15% ballast factor applied to the metal halide wattage
(400W lamp + 15% ballast = ~ 460W input).
•
Energy cost and ROI calculations are based on energy savings only and assume an LED fixture cost of
$193.00 per fixture.
• Maintenance savings from reduced bulb and ballast replacements are not included
in these calculations.
In this example with 20 fixture(s), total LED fixture investment is approximately $3,860.00, and estimated annual energy-only savings are $5,431.20. Simple payback based on energy savings alone is under 9 months. Maintenance savings from eliminating metal halide bulb and ballast replacements provide additional value throughout the fixture's 50,000-hour lifespan, but are not included in this ROI calculation.
What are the Cost Savings and ROI When You Convert from Metal Halide to LED?
Compare estimated energy costs, 5-year savings, simple payback, and ROI for replacing metal halide fixtures with LED.
300W LED UFO High Bay vs 1000W Metal Halide Replacement (with ballast)
Assumptions: Based on 12 hours/day, 365 days/year at $0.18/kWh,
50 fixture(s), and a 15% ballast factor applied to the metal halide wattage
(1000W lamp + 15% ballast = ~ 1,150W input).
•
Energy cost and ROI calculations are based on energy savings only and assume an LED fixture cost of
$353.00 per fixture.
• Maintenance savings from reduced bulb and ballast replacements are not included
in these calculations.
In this example with 50 fixture(s), total LED fixture investment is approximately $17,650.00, and estimated annual energy-only savings are $33,507.00. Simple payback based on energy savings alone is under 7 months. Maintenance savings from eliminating metal halide bulb and ballast replacements provide additional value throughout the fixture's 50,000-hour lifespan, but are not included in this ROI calculation.
Why LED Can Be Effective for Security Lighting
LED perimeter security lighting can support security applications when the lighting design provides appropriate illumination, uniformity, glare control, controls, and camera compatibility. Lighting should be coordinated with the overall security plan and applicable exterior-lighting requirements.
Instant Response Time
Many metal halide and high-pressure sodium fixtures require a warm-up period before reaching full output and may require additional time to restart after an interruption. LED fixtures generally reach rated output quickly, making compatible LED fixtures suitable for occupancy- or motion-based controls. Confirm the fixture, sensor, control settings, and operating temperature range for the intended application.
Light Quality for Security Cameras
Lighting can affect camera image quality, but camera performance depends on many factors, including illuminance, uniformity, glare, color rendering, spectral response, exposure settings, lens selection, and camera technology. High-pressure sodium often has limited color rendering, while LED products are available with a range of CCT and CRI options. Coordinate lighting selection with the camera manufacturer or security-system designer when identification or evidentiary imaging is important.
Understanding Light Distribution Consistency
Beam-angle descriptions do not guarantee identical light distribution between fixtures. Fixture optics, LED arrangement, shielding, output, and mounting orientation all affect actual performance.
Photometric Verification
Lighting design software using current manufacturer IES files can model predicted performance before purchase. A photometric study can identify potential hot spots, dark areas, and uniformity concerns, allowing comparison of optics and mounting arrangements. Verify that the IES file matches the exact fixture configuration being considered.
Safety and Performance Certifications
Certifications and qualifications vary by product, configuration, and application. Selected fixtures may be listed by a Nationally Recognized Testing Laboratory (NRTL), such as UL or Intertek/ETL, for applicable electrical-safety standards. Selected products may also be DLC qualified where the category is eligible. UL and ETL listings address electrical safety when applicable; DLC qualification is an efficiency and performance program and is not an electrical-safety certification.
Always verify certifications, ratings, and qualifications on the exact product cut sheet and, when applicable, through the certifying body’s listing database or the DLC Qualified Products List. NSF certification, IP ratings, hazardous-location approvals, surge ratings, and environmental ratings are also model-specific and should be verified for the intended installation.
Warranty and Warranty Support
LED lighting is a long-term infrastructure investment, so warranty details matter. Before specifying fixtures or retrofit kits, confirm the warranty term, covered components such as drivers, LED boards, sensors, and surge-protection devices, exclusions, required installation conditions, and whether labor is included or excluded. Also verify the supplier’s process for technical support and warranty claims, especially for multi-fixture installations where downtime creates operational risk.