How LEDs Pay for Themselves
One of the most common hurdles for large lighting projects...
Learn More →Get expert guidance from our Product Specialists who match the right solutions to your project's requirements.

We compiled a comprehensive collection of LED lighting insights based on 15+ years of commercial and industrial lighting experience. These tips cover everything from retrofitting existing fixtures to selecting the right wattage and color temperature for your specific application.
About this guide
Written by LED Lighting Supply’s commercial/industrial lighting team based on field support for warehouse, outdoor, and retrofit projects since 2008. For project-specific design, always confirm requirements with the site electrician, your local government authority, and applicable utility rebate program rules.
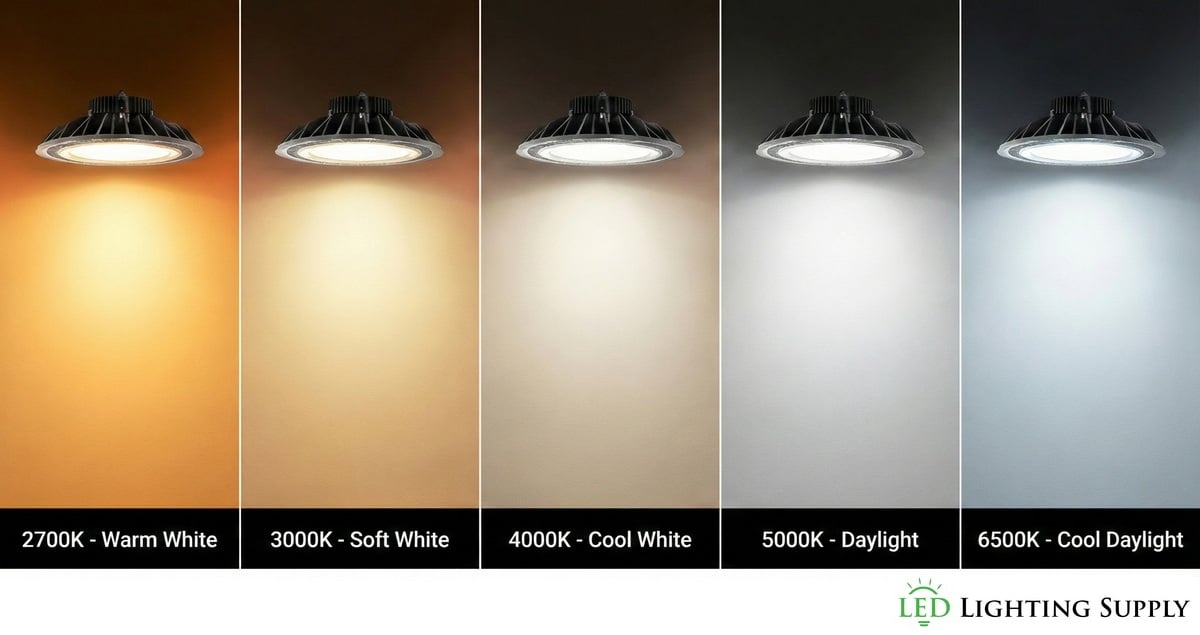
Selecting the appropriate color temperature significantly impacts both productivity and energy efficiency in your facility. After years of customer installations, we’ve identified optimal ranges for different applications. Consider color temperatures between 2700K to 6500K for most commercial applications. Lower temperatures around 2700K produce warmer, yellow-toned light, while higher temperatures near 6500K create cooler, blue-toned illumination.
For metal halide and HID replacements, 5000K delivers excellent results in warehouses and manufacturing facilities. When replacing high-pressure sodium fixtures, 4000K provides optimal visibility while maintaining a familiar light quality. Alternatively, choose 2700K or 3000K if your team prefers warmer yellow light. Office buildings, schools, and hospitals perform best with 4000K color temperature, promoting alertness and reducing eye strain during extended work periods.
Residential and hospitality applications benefit from 3000K, which contains minimal blue light and creates comfortable, relaxing environments. Modern LED chips from manufacturers like Nichia, CREE, and Samsung maintain consistent color temperature throughout their lifespan, unlike first-generation LEDs that experienced color drift over time.
Applications requiring precise color matching need careful attention to binning specifications. Our manufacturing engineers can specify exact color temperatures with appropriate tolerances, ensuring a consistent appearance across all fixtures in your installation. This proves especially critical in retail environments where color accuracy affects merchandise presentation and sales.
Retrofitting existing fixtures often provides better value than complete fixture replacement, particularly when your current infrastructure remains in excellent condition. Here are the key advantages we’ve observed across thousands of retrofit installations.
Installation time varies by fixture type and access conditions, but retrofits are often faster than full fixture replacement once the mounting approach is confirmed on-site. Compatibility depends on the existing housing dimensions, internal space, mounting points, and environmental sealing conditions, so we recommend verifying fit before ordering at scale.
Local building codes often require permits for new fixture installations, especially in historic districts or areas with specific aesthetic requirements. Retrofit installations typically bypass these requirements since you’re simply replacing bulbs and ballasts with more efficient components. This saves both time and permit costs while avoiding bureaucratic delays.
Single-electrician installation reduces labor costs compared to new fixture installations that often require two-person crews. Once familiar with the mounting system, electricians complete installations quickly and efficiently.

Another successful customer installation using LED aircraft hangar lights
Socket adapter retrofit kits appear convenient but create serious reliability and efficiency problems. Understanding these issues prevents costly mistakes and warranty voids. LED retrofit units weigh significantly more than original HID bulbs – often 5X heavier than the metal halide or high-pressure sodium bulbs they replace. Fixture sockets were never designed to support this additional weight, especially in outdoor applications where wind creates constant movement and vibration. Socket failure isn’t covered under warranty terms, and falling retrofit units often damage fixture glass and require complete replacement.
Our mounting bracket systems eliminate this weak point by distributing weight across the same mounting holes originally used for socket installation. DesignLights Consortium cannot award DLC Premium qualification to retrofit kits using mogul base adapters. This limitation affects rebate eligibility, as utility companies provide larger incentives for DLC Premium qualified products. Some utilities now offer rebates exclusively on DLC Premium products, making socket adapters financially disadvantageous. Proper mounting brackets require only a few additional minutes during installation but provide long-term reliability and maximum rebate qualification.
Power factor (PF) describes how effectively a fixture converts incoming electrical power into usable (real) power. It is the ratio of real power (watts) to apparent power (volt-amps, VA). In plain terms: lower PF generally means higher current for the same wattage, which can reduce circuit capacity and increase electrical stress in some systems.
Important: A low power factor does not automatically mean the fixture “uses double the watts.” Most facilities are billed primarily on kWh (real power), but low PF can still matter for panel loading, generator sizing, and in some commercial/industrial rate structures where utilities apply demand charges or power factor penalties.
When comparing products, review the driver specs on the cut sheet and confirm PF values at the operating voltage and wattage being used.
Purchasing LED fixtures based solely on wattage leads to inadequate lighting and wasted money. Proper LED selection requires a systematic approach based on actual lighting requirements.
Measure current light levels using a light meter or smartphone app to establish baseline requirements. If existing lighting performs well, note the foot-candle readings. Identify areas that seem too bright or too dim for future adjustments.
Photometric studies use specialized software to model your space and simulate fixture performance before installation. We input your facility dimensions, ceiling heights, and mounting locations, then test different fixtures and optics to achieve optimal light distribution. This process shows exact foot-candle readings throughout your space, identifies uniformity ratios, and allows adjustments before purchase. Most photometric studies are provided free for standard applications.
Quality fixtures produce lumens efficiently while maintaining long-term performance. Our fixtures undergo rigorous testing and burn-in procedures to ensure rated output throughout their warranty period. Proper engineering ensures you get specified performance, not just low initial cost.
Once you identify the correct fixture for your lighting requirements, you’ll know the actual wattage needed. This systematic approach eliminates guesswork and prevents costly mistakes from over-lighting or under-lighting your facility.
LED products offer two connection methods: direct-connect and ballast-compatible. Each approach has distinct advantages depending on your installation priorities and long-term maintenance plans.
Direct-connect fixtures require standard AC power input. The LED driver converts AC power to DC for the LED chips, eliminating dependence on existing ballasts. Installation involves removing the fixture’s ballast and bulb, then installing the LED driver and head assembly. Direct-connect solutions typically achieve higher efficiency ratings since power flows directly to the LED driver without ballast losses. This approach provides maximum long-term reliability by eliminating aging ballast components.
These products work with existing ballasts already installed in fixtures, reducing installation time but creating potential complications. Ballast compatibility isn’t universal – your existing ballast may not work with the LED product, requiring ballast replacement anyway. Existing ballasts represent future maintenance issues. Ballasts eventually fail, creating service calls and replacement costs. Direct-connect installations eliminate this concern while providing superior efficiency. Our experience favors direct-connect solutions despite slightly longer installation time. The efficiency gains and reduced maintenance requirements provide better long-term value than the modest installation time savings from ballast-compatible products.
LED lifespan involves multiple components, each with different service lives. Understanding these factors helps set realistic expectations for maintenance and replacement planning.
LED chips are rated using L70 measurements – the hours required for light output to degrade to 70% of initial lumens. Quality chips typically achieve 50,000 to 100,000 hours L70 ratings. Chip longevity depends on operating conditions. Manufacturers can drive LEDs at full capacity for maximum light output or reduce power for extended life. Quality manufacturers balance output with longevity by using an adequate number of chips rather than overdriving fewer chips. Heat management critically affects LED life. Better thermal design and heat sinking extend chip life significantly. This explains price differences between premium and economy LED products.
LED drivers convert AC power to DC at proper voltage and current levels. Quality drivers from manufacturers like Meanwell or Philips typically last 50,000 hours under normal operating conditions. Driver replacement becomes necessary before LED chips reach end-of-life in many installations. Quality fixtures with easily accessible drivers for straightforward replacement when needed. Marketing claims of extremely long LED life often ignore driver limitations. A fixture claiming 200,000-hour LED life with a 50,000-hour driver requires driver replacement during the fixture’s service life. Realistic expectations include 10+ years of service from quality LED products, with potential driver replacement extending total fixture life well beyond that timeframe.

Another LED Lighting Supply Successful conversion using LED warehouse lights
LED dimming capability depends entirely on the driver technology, not the LED chips themselves. Proper dimming selection saves energy and extends fixture life while providing optimal lighting control. Dimming benefits extend beyond mood lighting. Warehouses don’t require full illumination in unoccupied areas. Restaurants need adjustable lighting for different time periods. Dimming reduces energy consumption and extends LED life by reducing heat generation.
Triac dimming works with wall-switch dimmers common in residential and small commercial applications. The dimmer limits the current sent to the fixture, and compatible LED drivers respond accordingly. Compatibility between Triac dimmers and LED fixtures must be verified. Incompatible combinations cause driver failure and void warranties. Always confirm dimmer compatibility before installation.
Commercial and industrial fixtures commonly use 0-10V dimming systems for sophisticated lighting control. These drivers include gray and purple control wires that receive voltage signals from external controllers. Motion sensors can automatically dim fixtures in unoccupied areas, then return to full output when movement is detected. Programmable controls adjust lighting based on time of day, occupancy, or daylight levels. Control voltage determines dimming level: 1V signals produce 10% output, 5V signals create 50% output, with linear response throughout the range. Dimming saves energy and extends LED life while providing optimal lighting for different activities and occupancy levels.
Commercial and industrial facilities use various voltages, requiring proper driver selection for safe and efficient operation. Understanding your facility’s electrical system prevents installation problems and ensures optimal performance.
Facilities typically operate between 100-480 volts at 60Hz, with specific voltages including: 100-120V for small businesses and retail spaces,
Standard drivers in most fixtures handle 100-277V constant current operation. These drivers automatically detect input voltage and adjust operation accordingly, simplifying installation and inventory management. High-voltage drivers accommodate 277V-480V input with automatic switching capability. These drivers cost slightly more but eliminate the need for voltage conversion equipment in high-voltage applications. Canadian installations require CSA-certified drivers for 347V operation. Our high-voltage drivers carry proper certifications for safe Canadian operation.
When specific fixtures don’t offer high-voltage drivers, step-down transformers provide voltage conversion. These compact units install before the LED driver, converting incoming high voltage to levels compatible with standard drivers. Understanding your electrical system voltage ensures proper driver selection and avoids costly installation delays or equipment damage.
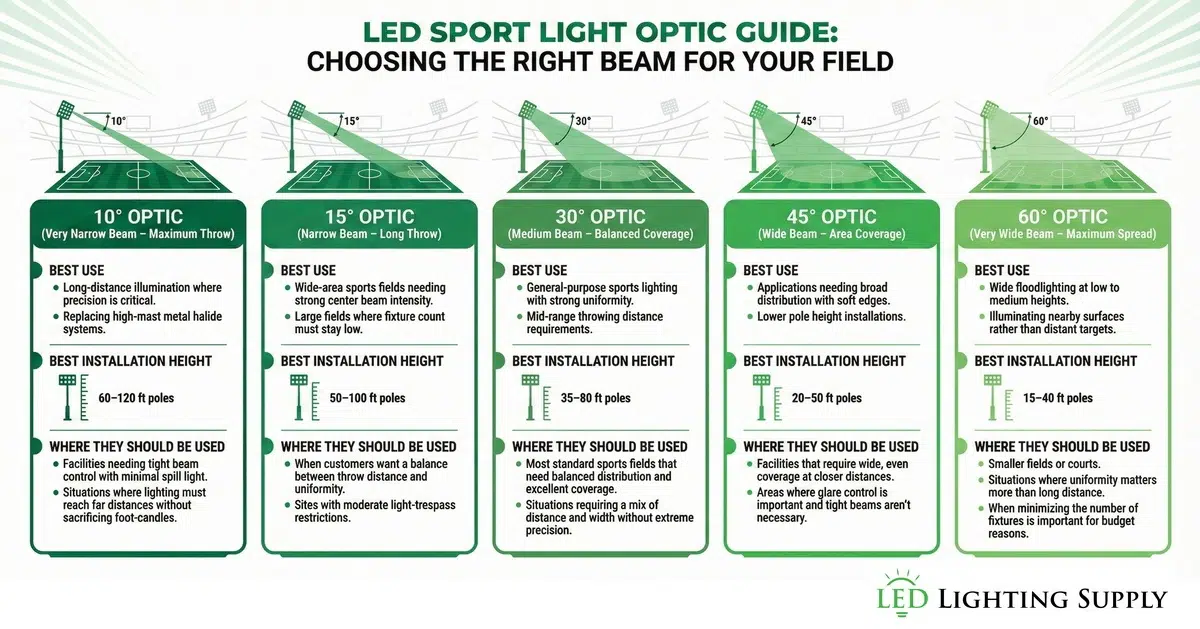
Improper optics selection creates lighting disasters – dark spots, glare, and uneven distribution that no amount of additional fixtures can correct. Optics determine how LED light distributes throughout your space. Optics manipulation addresses various challenges:
Professional lighting layout forms the foundation of optics selection. Import scaled drawings into our lighting design software, establish target foot-candle levels, and begin systematic fixture placement and beam pattern testing. Two critical measurements determine success: Achieving target average foot-candle readings.
Maintaining proper min/max ratios between brightest and darkest areas. Industry-standard uniformity ratios prevent the “cave effect” where bright spots alternate with dark zones. Uniform light distribution creates comfortable, productive environments regardless of fixture spacing constraints. Purchasing fixtures without understanding their photometric performance in your specific space often results in expensive remedial work or complete system replacement.
Color Rendering Index measures light quality by rating how accurately colors appear under artificial light sources. CRI selection affects productivity, safety, and in retail environments, sales performance. LED provides superior color rendering compared to older technologies like metal halide, high-pressure sodium, and fluorescent lighting.
Quality LED light reduces the lumens required for equivalent visual performance – high-quality lumens need less quantity. CRI ratings range from 0 to 100, with 100 representing perfect daylight quality. The red spectrum shows the most dramatic differences between CRI levels. Red objects appear dull and gray under CRI 70 lighting but show vibrant, accurate color under CRI 90 illumination. Higher CRI diodes cost more than standard options, making application-specific selection important for cost control.
Clothing stores, car dealerships, and product showrooms require CRI 90+ for accurate color representation. Colors that appear vibrant and appealing drive purchasing decisions, making high-CRI lighting a direct sales investment.
Adequate light levels typically matter more than perfect color rendering in most industrial applications. Standard CRI 70-75 performs well unless quality control stations require color matching. Our standard high bay fixtures achieve CRI ratings in this range.
Schools generally perform well with standard CRI 70 in classrooms, hallways, and gymnasiums. Art classrooms or areas used for video production benefit from higher CRI ratings. Most applications work excellently with CRI 70+ lighting, providing good color rendering without premium costs.

Converting sports fields using LED baseball field lights and LED softball field lighting
Utility rebates significantly reduce LED project costs, but eligibility requirements and application processes vary widely between utility companies. Understanding these programs maximizes your savings potential.
Your electric utility company sets rebate programs, payment amounts, and qualification requirements. Research your specific utility’s current offerings, as programs change annually and funding can be exhausted before year-end.
Most utilities require DesignLights Consortium qualification for rebate eligibility. Look for DLC logos on product specifications to identify qualifying fixtures. All DLC products include a minimum 5-year warranty and meet strict performance standards.
DLC offers two efficiency levels: Standard and Premium. Premium-qualified fixtures achieve higher efficiency ratings and typically qualify for larger rebates. The efficiency improvements often provide additional operational savings beyond the rebate advantage.
Utility companies incentivize the highest-efficiency products through larger rebates for DLC Premium fixtures. Some utilities now offer rebates exclusively on Premium-qualified products, making efficiency selection financially critical. Many of our fixtures qualify for DLC rebates, including area lights, high bays, and wall packs. Contact us to verify rebate availability and assist with application requirements.
Parking lot lighting requires specific distribution patterns to achieve uniform coverage and eliminate dark spots. Type classifications help specify appropriate fixtures, but photometric analysis confirms performance.
Visualize distribution patterns as circles of light with your fixture at the center:
Most LED shoebox lights in parking lots use Type 3 and Type 5 distributions, depending on pole spacing and coverage requirements.
Modern lighting software imports your parking lot layout and existing pole locations. We place LED fixtures at mounting points and calculate foot-candle distribution throughout the area. Different optics and lumen outputs can be tested to optimize uniformity and light levels. This analysis eliminates guesswork and ensures proper coverage before installation.

LED conversion savings depend on your current fixture wattage, replacement LED wattage, operating hours, and electricity costs. Accurate calculations require understanding actual power consumption, including ballast draw.
Identify existing fixture wattage and account for ballast consumption. HID and metal halide fixtures include ballasts that consume approximately 15% additional power beyond bulb ratings. A 400-watt metal halide system actually consumes 455-460 watts total.
Proper LED sizing starts with required light levels, not wattage matching. Complete photometric analysis determines the correct fixture and its actual power consumption. This systematic approach ensures adequate lighting while maximizing energy savings.
Compare total current power consumption with LED fixture wattage, multiply by operating hours, and electricity costs. For example, replacing a 400-watt HID system (460W total) with a 150-watt LED fixture saves 310 watts per fixture. Our online savings calculator simplifies these calculations, or our team can run a detailed analysis for your specific installation.
LED fixtures use either active cooling (fans) or passive cooling (large heat sinks) for thermal management. Both approaches work effectively, and fan technology has proven reliable across thousands of installations.
Fans circulate air over heat sinks, efficiently removing heat and distributing it throughout the fixture housing. This allows smaller, more compact heat sink designs that fit within existing fixture housings during retrofits. The computer, gaming, and electronics industries rely heavily on fan cooling technology. Our experience since 2008 includes only one fan failure across extensive LED installations, demonstrating excellent reliability.
Passive systems use larger heat sinks without fans, often integrating the LED board directly with fixture housings for heat dissipation. This approach works well in applications like UFO high bays where the fixture housing serves as the heat sink.
Fan technology operates reliably and typically outlasts LED product life expectancy. However, open fixtures in extremely dusty environments might benefit from passive cooling to avoid dust accumulation on fan components. Neither cooling method presents inherent reliability concerns when properly engineered and manufactured.
L70 ratings indicate LED longevity by measuring the time required for light output to degrade to 70% of initial performance. This specification helps compare product lifespans and plan maintenance schedules.
Lumen maintenance measures the decrease in light output over time. L70 ratings specify the hours needed for fixtures to produce 70% of their initial lumens. Some high mast fixtures achieve L70 ratings exceeding 200,000 hours. L70 testing allows direct comparison between products from different manufacturers, helping identify the most durable solutions for long-term installations.
L90 testing measures time to reach 90% of initial output. Third-party laboratories conduct actual runtime testing to determine L90 values, typically documented in TM21 reports. L70 values are calculated based on L90 test results, since running products for tens of thousands of hours would be impractical for product development and certification. Both measurements provide valuable insight into expected performance degradation and maintenance planning requirements.
Compare estimated energy costs, 5-year savings, simple payback, and ROI for replacing metal halide fixtures with LED.
Assumptions: Based on 12 hours/day, 365 days/year at $0.20/kWh,
20 fixture(s), and a 15% ballast factor applied to the metal halide wattage
(400W lamp + 15% ballast = ~ 460W input).
•
Energy cost and ROI calculations are based on energy savings only and assume an LED fixture cost of
$193.00 per fixture.
• Maintenance savings from reduced bulb and ballast replacements are not included
in these calculations.
In this example with 20 fixture(s), total LED fixture investment is approximately $3,860.00, and estimated annual energy-only savings are $5,431.20. Simple payback based on energy savings alone is under 9 months. Maintenance savings from eliminating metal halide bulb and ballast replacements provide additional value throughout the fixture's 50,000-hour lifespan, but are not included in this ROI calculation.
Compare estimated energy costs, 5-year savings, simple payback, and ROI for replacing metal halide fixtures with LED.
Assumptions: Based on 12 hours/day, 365 days/year at $0.18/kWh,
50 fixture(s), and a 15% ballast factor applied to the metal halide wattage
(1000W lamp + 15% ballast = ~ 1,150W input).
•
Energy cost and ROI calculations are based on energy savings only and assume an LED fixture cost of
$353.00 per fixture.
• Maintenance savings from reduced bulb and ballast replacements are not included
in these calculations.
In this example with 50 fixture(s), total LED fixture investment is approximately $17,650.00, and estimated annual energy-only savings are $33,507.00. Simple payback based on energy savings alone is under 7 months. Maintenance savings from eliminating metal halide bulb and ballast replacements provide additional value throughout the fixture's 50,000-hour lifespan, but are not included in this ROI calculation.
LED perimeter security lighting requires instant response, high-quality light output, and reliable operation. LED technology addresses HID limitations while providing superior security system integration.
Metal halide and high-pressure sodium fixtures require 15-30 minutes to reach full output, making them unsuitable for motion sensor applications. LED fixtures achieve full output in less than one second, providing immediate illumination when motion is detected. Motion-controlled LED security lighting saves energy by operating only when needed while providing maximum deterrent effect. Sudden transition from darkness to bright illumination startles potential intruders more effectively than constantly illuminated areas.
Security camera systems perform significantly better under high-CRI LED lighting compared to low-quality HID sources. High-pressure sodium produces notoriously poor color rendering, while LED provides excellent color accuracy for facial recognition and incident documentation. LED’s superior light quality helps law enforcement identify suspects and provides clearer evidence for prosecutions.
Beam angle specifications don’t guarantee consistent light distribution between different fixtures. Photometric testing reveals significant variations in actual performance, even among fixtures claiming identical beam angles.
Lighting design software using manufacturer IES files reveals actual performance before purchase. These studies show exact foot-candle distribution, identify hot spots or dark areas, and allow optic adjustments to optimize uniformity. Professional photometric analysis protects against costly mistakes and ensures optimal lighting performance for your specific application requirements.
All our fixtures carry essential certifications, including DLC Premium, UL Listed, and ETL Listed approvals. These certifications ensure safety, performance, and energy efficiency while qualifying your project for utility rebates and tax incentives. DLC Premium certification guarantees the highest efficiency standards and maximum rebate eligibility.
Always verify certifications on the product cut sheet and, when applicable, through the certifying body’s listing/database (UL/ETL) or the DLC Qualified Products List for rebate compliance.
LED lighting is a long-term infrastructure, so warranty details matter. Before specifying fixtures or retrofit kits, confirm the warranty term, what components are covered (driver, LED boards, sensors), and whether labor is included or excluded. Also, verify the supplier’s process for technical support and warranty claims, especially for multi-fixture installations where downtime creates operational risk.

Dwayne Kula - Founder, President & Chief Technology Officer, LED Lighting Supply
Dwayne Kula is the Founder, President, and Chief Technology Officer of LED Lighting Supply, a company he established in 2008 to help businesses adopt reliable, high-performance LED lighting solutions. With more than 17 years of experience working with LED technology and lighting systems, Dwayne has developed extensive expertise in LED fixtures, energy-efficient lighting design, and commercial and industrial lighting applications.
In his role, Dwayne evaluates lighting technologies, guides product selection, and leads the development of technical and educational content for the LED Lighting Supply website. A significant part of his work involves creating articles and resources that help facility managers, contractors, and engineers better understand LED lighting and make informed purchasing decisions. His hands-on industry experience and technical knowledge help ensure customers receive practical, trustworthy guidance when selecting LED lighting solutions.